How to Create a Branded Accessory from A to Z
Branded accessories are powerful marketing tools. They strengthen a company’s image, increase perceived value, and can build long-term customer loyalty. Whether it’s a leather wallet, a keychain, a notebook, a travel pouch, or a high-end item made for the hospitality industry, creating an accessory from A to Z requires a mix of creativity, method, and industrial know-how.
In this guide, we walk through the entire process, from concept to finished product, to turn an idea into a real accessory that’s consistent with your brand and ready for production.
Step 1: Concept and Ideation
Before drawing anything, clarify the project’s foundations. A good accessory is not just “pretty”, it serves a clear purpose.
Ask yourself:
- What is the goal of this accessory? Branding, client gift, retail sale, VIP, event, product launch.
- Who is it for? Premium clients, corporate customers, travellers, eco-conscious customers, young professionals.
- What practical use should it have? Carrying, organisation, comfort, convenience, souvenir, experience.
- What emotions should it convey? Refinement, modernity, warmth, boldness, simplicity, exclusivity.
- Where and how will it be distributed? n-room, at reception, in a shop, via e-commerce, at a trade show.
At this stage, use mood boards, material references, and inspiration for shapes and finishes. The goal is to set a clear direction, not to finalize the design.
Step 2: Product Design
Once the idea is approved, you move into design. The priority here is to create something that is both desirable and realistic to manufacture.
Key points to define:
- Shape and dimensions
The product should be ergonomic, intuitive to use, and suited to its context. - Materials
Leather, faux leather, canvas, cotton, metal, wood, silicone, paper, premium cardboard. The choice affects the look, durability, cost, and production method. - Finishes
Stitching, painted edges, lining, closure, embossing, printing, zipper, rivets. - Branding
Where to place the logo so it’s visible without being aggressive. What size, what marking method, what color. - Production constraints
What looks easy in a render can be complex in a factory. You need to anticipate weak points, stress areas, wear, and tolerances.
At this stage, detailed sketches, tech packs, and 3D renderings help a lot. A render aligns all stakeholders and reduces mistakes before prototyping.
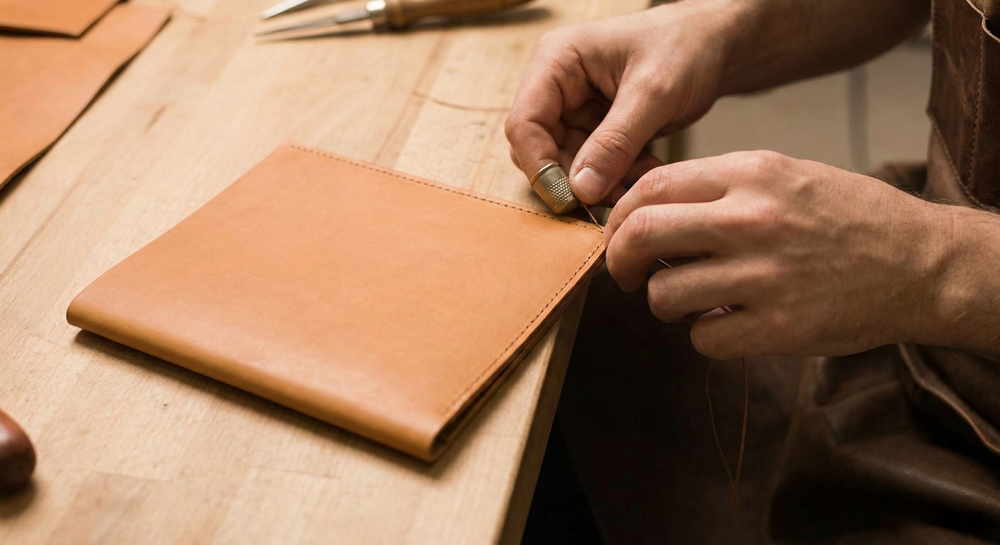
Step 3: Prototyping
Prototyping is where the idea becomes tangible. It often reveals adjustments that need to be made.
Goals of prototyping:
- Validate real-world dimensions
- Test usability and ergonomics
- Assess perceived quality
- Confirm the strength of stitching, closures, and assembly
- Fine-tune branding details
It’s common to do 1 to 3 iterations. That’s normal, and it’s often what separates a “decent” product from a premium one.
Step 4: Pricing, MOQ, and Planning
Before launching production, discuss the following:
- Detailed quote
Materials, labor, branding/marking, packaging, quality control, transport - MOQ (minimum order quantity)
Some workshops require a minimum, especially if materials or components are specific - Timelines
Prototyping, validation, production, shipping, delivery - Target budget
Per unit, but also total, with margins and contingencies
Step 5: Production
Once the prototype is validated, production begins. This is where rigor matters as much as design.
We focus on:
- Validating a “golden sample”
The reference sample that must match the final expected result - Tracking production step by step
Cutting, assembly, marking, finishing - Keeping communication simple and clear
Tech packs, photos, checklists, approvals
Step 6: Quality Control
Quality control protects your brand. A premium accessory is judged by its details.
What we check carefully:
- Logo alignment
- Stitching consistency
- Material and finish quality
- Closure performance
- No visible defects
- Color consistency and overall look
Planning a tolerance rate and a replacement protocol is often essential, especially for large runs.
Step 7: Packaging and Delivery
Packaging is part of the experience. For a branded accessory, it should match the brand universe and promise.
Possible elements:
- Rigid box, pouch, tissue paper
- Thank-you card
- Premium label/tag
- Protective outer packaging for logistics
Finally, plan shipping in advance: incoterms, taxes, storage, transport lead times, split deliveries.
Conclusion
Creating a branded accessory from A to Z is a structured process combining strategy, design, and execution that leads to stronger perception, a better customer experience, differentiation, and sometimes even a new revenue stream.
Let's create a world for your guests together
Download Catalogue
Learn more about creating your accessories with us by downloading our catalogue. To download it, please enter your details below to access it.
DOWNLOAD CATALOGUE BY SUBSCRIPTION
DOWNLOAD CATALOGUE BY SUBSCRIPTION
ADDRESS
Chemin du Suchet 2
1805, Jongny
Switzerland
+41 21 652 05 09
info@lgbusiness.com